Python, Serverless, and Lambda

A brief story about yet another long struggle with Python and wrapping my head around it vs. what I used know about Perl, and what I know about Java and JavaScript. This serves as my final post for 2017, and hoping for more time to blog in 2018!

Lambda and Python

I like setting up my environments so that they work as reasonably close to the target platform as much as possible. When I was developing AWS Lambda in Java and Javascript, this was fairly straightfoward. For my Java projects, I typically used Maven to manage dependencies. Similarly, with Javascript, I would use NPM to manage those dependences. In either case, I would end up with either a jar or zip file that were nice and neat packages to send to AWS.

Yes, AWS gives guidance on how to package Python for Lambda deployment. This is good and well, but who wants to drop all of their dependencies in the same directory as your code. I don’t! I prefer a “lib” or “vend” or some other subdirectory.

However, this story isn’t about that. It’s about the journey of getting to the point where I can even complain about having my dependencies in a sub folder.

Serverless and Python

On my development system, I use Ubuntu 16.04 as my primary operating system. By default, this includes Python 3.5. This is fine for most things. Where this becomes a problem is when other tools enforce other version requirements…

I like using the Serverless Framework to manage the development of my Lambda functions. I’ve been using it since pre-1.0 (yes, including needing to rewrite when they made some major direction changes during their 1.0 alpha!). It does a decent job and helps to keep me honest and fits into my overall workflow.

That being said, it (and AWS) wants Python 3.6. So much so that Serverless aborts when attempting to use Python 3.5.

Serverless error on version mismatch

So yeah. Seriously frustrating. These things just “sort of work” with Java and Javascript…

Hand to Hand Combat

Googling around pointed at several options. Many pointed directly at upgrading the system Python to 3.6. Having completely trashed operating systems before by doing such foolhardy things, I hardly felt that this was the correct choice. However, I did run across an AskUbuntu suggestion for using pyenv to manage multiple Python installations. This seemed more my speed.

If you have used something like Node Version Manager (NVM), you will be somewhat familiar with the premise of pyenv. Succinctly, pyenv is a tool that can be used to manage various Python installations. It also includes some plugins that handle extended features like handling Python “virtual environments” across the multiple installed versions.

Setting up pyenv

Setting up pyenv is pretty straightforward. It installs and runs locally under your account. However, there are some dependencies you’ll need to install in order to compile other verisons of Python.

1
2
3
sudo apt install -y build-essential libbz2-dev libssl-dev libreadline-dev libsqlite3-dev tk-dev
curl -L https://raw.githubusercontent.com/yyuu/pyenv-installer/master/bin/pyenv-installer | bash

After the files are installed, you append this to the bottom of your .bashrc:

1
2
3
export PATH="/home/seliger/.pyenv/bin:$PATH"
eval "$(pyenv init -)"
eval "$(pyenv virtualenv-init -)"

Logout and log back in for the changes to take effect and you are good to go.

Getting to Python 3.6

Letting pyenv build Python is also fairly simple.

1
pyenv install 3.6.4

That installed version 3.6.4, which was current at the time of writing. The following two commands make use of a pyenv plugin called pyenv-virtualenv to configure a virtualenv for the newly installed Python. It also sets it to be the default virtualenv whenever you spawn new shells.

1
pyenv virtualenv 3.6.4 general

This created the “general” virtualenv. Feel free to call it whatever you like.

1
pyenv global general

This sets the default virtualenv to general.

Where it went wrong…

I was super excited. Now I had Python 3.6.4 and therefore ready to start working on some Lambda calls in Python. Or so I thought…

Serverless error, even with 3.6

What insanity is this? I just installed seemingly installed 3.6.4, and the error is seemingly pointing in that general direction. So what gives?

Long story short, the virtual environment is missing the python3.6 binary.

Virtual environment, sans python3.6 binary

You’ll see that binaries like pip3.6 appear, but not python3.6. Serverless counts on the python3.6 binary as it wants to enforce version compatibility between local invocations and when the functions live in AWS.

Are you kidding me?!?

Now what?

At this point I’m really thinking to myself, “Had I just done this in Java or Javascript, I’d be done by now…” However, I want to improve my Python knowledge and use the same language that my favorite to do list manager Todoist is using, since I am writing code that provides some desired functionality using their APIs.

So here we are at a crossroads…

Really digging in…

Apparently I wasn’t the only one to notice this. On GitHub, in the pyenv-virtualenv repo, the following issue exist:

I spent some time working with the thread in #206 as it seemed to be closest related. I dug into their code as well as the code for venv, the Python 3 way of generating virtual environments.

Finding the Problem

Reading the code for venv, it seemed odd that they would generate (link) binaries such as python and python3, but not python3.X. With that, I dug around in Python’s bug database. The behavior seemed incongruous with what the legacy virtualenv and conda would do. With that, I opened a bug:

The Response

The Python folks were quite zippy in their response. Apparently this is expected behavior. Basically, if you call -m venv using the python3 command, you don’t get a python3.Y binary. However, if you call -m venv with the python3.6 binary, you DO get all the binary.

Seems “off” to me, but they confirmed that this is the intended behavior.

On the plus side, the Python developer who responded did indicate that the documentation is unclear (read: completely fails to mention) the nuances with how the venv module is called. So the ticket has been renamed and will now work to resolve the documentation issue.

The Workaround

So I submitted this PR that works around the issue by having pyenv-virutualenv call -m venv with the “fully qualified” binary (in this case python3.6).

Thus far, the PR sits, yet to be applied. Honestly, I’m not sure it’s the best solution, given that Python’s expected behavior is to behave differently based on how it is called. Is it really pyenv-virtualenv’s right to force the end user’s hand on this? For my use case yes, but what about other use cases I’m not considering?

Conclusion

I’m still not thrilled with the Python ecosystem. It is uneven and working within its constructs are difficult at best. I know people rave over it, but I can do the same things in Java and Javascript without the pomp and circumstance. It’s disappointing.

However, I’m not going to let this get to me. I’m going to press on. I’m going to continue to push for a proper resolution to the pyenv-virtualenv situation and contribute where I can to push the community in the right direction.

In the meantime, if you have the need for your pyenv-virtualenv to generate the proper binaries, clone my fork of pytenv-virtualenv into your ~/.pyenv/plugins sub directory.

I hope that you have a prosperous 2018!! Thanks for reading!
Using Redis to Cache the Todoist Python API

Herding the Cats

I’ve taken a liking to Todoist for tracking my daily tasks, professional goals, and helping my managers organize our major intiatives. However, their reporting is lacking. You can use the print feature, but that’s not terribly flexible. Furthermore, I’d like to be able to have some sort of mechanism to track changes over time.

Fortunately, Todoist provides a couple different APIs to develop against. They also provide support for a Python library that wraps their REST and Sync APIs.

Using the Python API

What I want to do is build a service that provides some additional value for Todoist users, and I want to implement that using serverless technologies atop AWS Lambda. When you get into the serverless environment, you are restricted on things like storing data persistently within the serverless platform.

The Todoist Python library provides two modes of operation:

  • Cache results locally to files
  • No caching whatsoever

Neither of these are scalable solutions, particularly if scalablity and not being throttled are requirements.

How to fix?

I am not a Python-ista. I come from a Perl, Java and, more recently, a JavaScript background. Looking at the source for the Python API, I want to immediately re-architect the API code so that storage backends can be arbitrarily changed out depending on the desired backend.

That’s a bit involved for the way the API class is currently written. I’m also not quite comfortable to take an axe to their API and fight that battle (yet).

Without completely rewriting the Todoist Python library, how did I work around this?

One thing I did learn about is monkey patching to dynamically modify classes. With that said, I was able to fairly trivally replace two methods within the TodoistAPI class in order to use Redis as a backing store for the cached Todoist data.

Is this perfect? No! However, it does allow me to continue working on my prototype without getting bogged down in a much larger conversation…

Implementing the solution

To keep it simple, all of this code landed in the prototype script I’ve been using to explore the API and the library. One could abstract this out appropriately (and perhaps that’s yet a better position than attempting to re-architect the Todoist Python library).

Below are two methods I created. The intent was to mimic, as closely as possible, the original API code as to not disturb the original functionality within the library. This was done by replacing two specific internal calls, _read_cache() and _write_cache().

You will note that I am not doing anything fancy with Redis. I had started with delusions of grandeur and started down the path of using HSET and HGET to store hashes directly. I quickly learned that this is not straightforward, especially when dealing with types other than strings. It is possible to do all sorts of contortions to get there, either manually mapping and decoding the data returned from Redis, or using Redis 4 and the ReJSON module. One should note that (at the time of writing) AWS ElastiCache is still on Redis 3, and therefore does not support modules.

With my tail between my legs, I fell back to simply serializing the JSON completely as a string and also the sync token – mimicking exactly the way the original methods work on the file system, except instead writing that data to Redis. It works for now, but I’m waiting for the other shoe to drop as I dig further into the weeds.

Read from the Cache

1
2
3
4
5
6
7
8
9
10
11
12
13
14
15
16
## Monkey patch the TodoistAPI instance to use Redis for the caching mechanism
def _monkey_read_cache(self):
if not self.redis:
return
try:
self._update_state(json.loads(self.redis.get(self.token + '.json').decode('utf-8')))
self.sync_token = self.redis.get(self.token + '.sync').decode('utf-8')
except AttributeError:
print('[WARN] - There was no data to decode (likely a cache miss).')
return
except:
print("Unexpected error:", sys.exc_info()[0])
raise

Write to the Cache

1
2
3
4
5
6
7
8
9
def _monkey_write_cache(self):
if not self.redis:
return
self.redis.set(self.token + '.json', json.dumps(self.state, default=state_default))
self.redis.set(self.token + '.sync', self.sync_token)
def state_default(obj):
return obj.data

Below is where the magic happens. Using the ability to monkey patch, I insert my newly crafted methods in place of the originals. The code following this proceeds to initialize the API and use it as per the Todoist Python library docs.

Inject Methods into the Todoist API

1
2
3
4
5
6
# Inject the functions
todoist.TodoistAPI._read_cache = _monkey_read_cache
todoist.TodoistAPI._write_cache = _monkey_write_cache
# Inject a working Redis session into the TodoistAPI instance
todoist.TodoistAPI.redis = redis.StrictRedis(host="localhost", port=6379, db=0)

Rethinking the Python Library

I’m surprised they didn’t do this out of the gate. They did such a good job abstracting out all of the various object types that could come from their web service, but didn’t fully think through the caching issue. I do give them kudos for considering SOME FORM of caching, as that provides immediate relief on their backend. However, the library needs some work in order to provide scaling and protections on the “client’s” side as well. Here’s what I’m thinking:

  • Abstract the caching piece out of the TodoistAPI class and implement a generic “None” caching class (aka the general interface). This interface would implement empty _read_cache() and _write_cache() methods.

  • Provide a default file system caching class that would implement the current file system reading / writing that is currently embedded in the current TodoistAPI class.

  • Allow the TodoistAPI class to pass in a configurable caching class. This would be something like a formal implementation of this Redis monkey patch, or other classes that implement caching with other backing stores. If no caching class is given to the API, it defaults to the file caching class so that it behaves as it does today out of the box.

I have forked the todoist-python library, but I’ve not yet committed the changes I’ve been batting around. I will do that soon.

Wrapping Up

That’s it! Making a couple slight tweaks to the existing Todoist Python library will enable you to write to Redis as a caching store. One could conceive that it would be equally trivial to implement these methods to write to other backends like DynamoDB or other platforms.

I have provided this full snippet as a Gist on Github.

Forwarding Mail from Amazon Workmail

If you are using Amazon WorkMail, but long for the interface of something like Gmail, then this post is for you! While I believe Amazon intended to make it tricky to forward mail from its service, it is still possible.

First, you need to login to the web version of Amazon Workmail. This is accessible from your AWS Apps URL:

https:// your-organization-alias .awsapps.com/workmail/

  • Once you have authenticated and the mail interface comes up, you will want to click the gear icon in the upper right-hand corner of the window.

  • From the settings screen, select Email Rules from the left-hand navigation pane.

  • Click the New Rule button

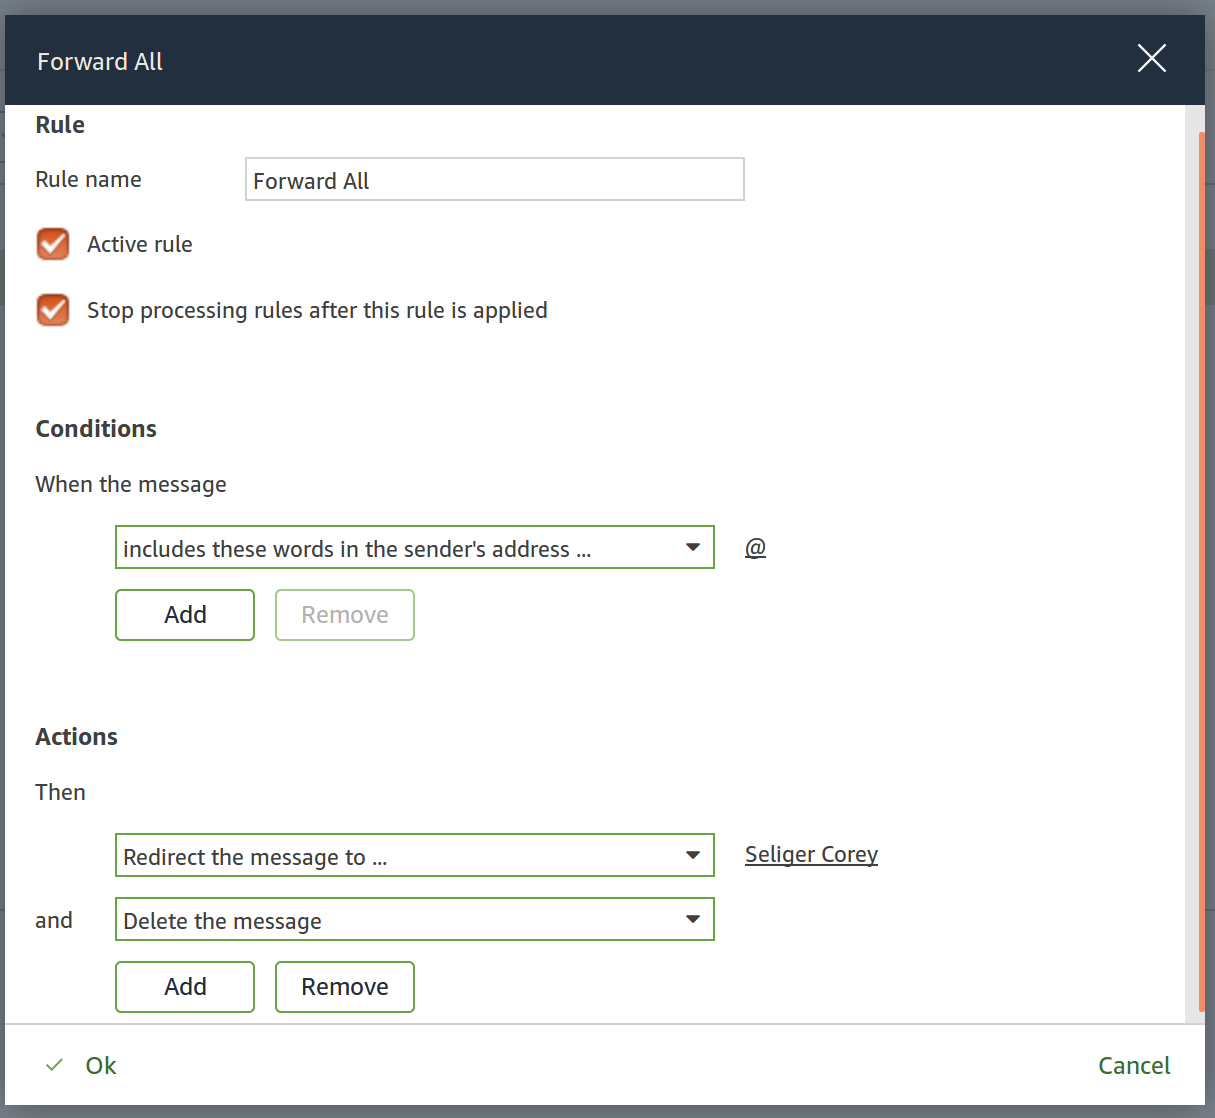
  • A new rule dialog window will appear. Fill in the following details:

    • Rule Name: Forward All
    • For Conditions, select includes these words in the sender’s address
    • Click the Add button
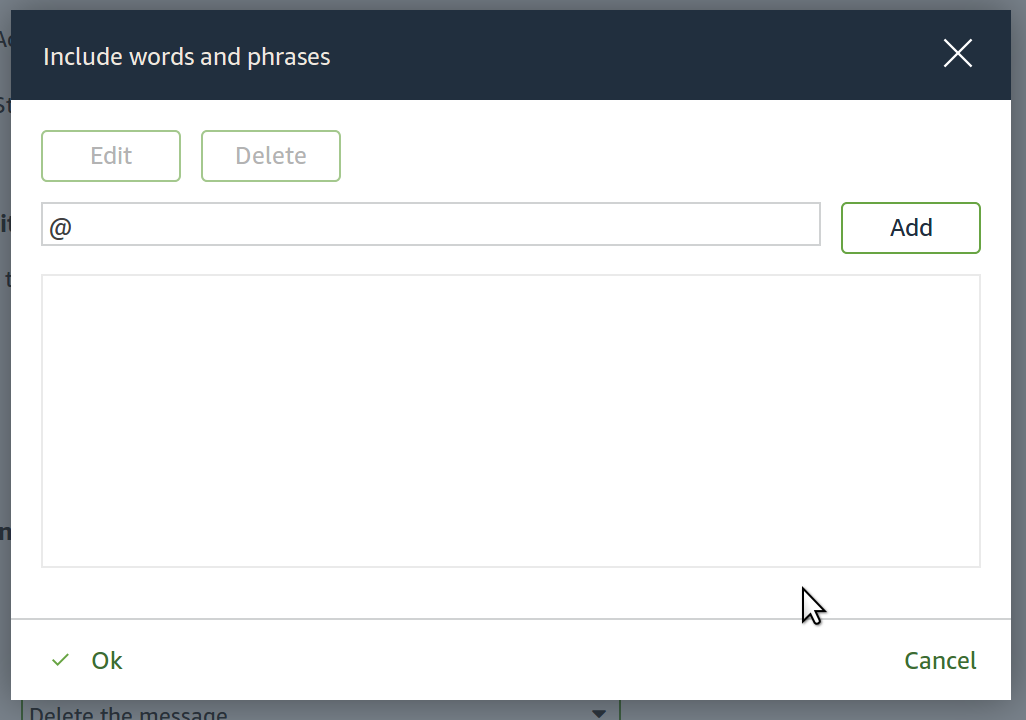
  • In the inclusion dialog:

    • Enter a single @ in the text box
    • Click Add
    • Click OkInclusion entry dialog
  • Back on the rule dialog, finish setting these values for Action:

    • Select “Redirect message to…”
      • Click Select Recipients to the right of the selection and add your destination email address in the To field
      • Click Ok
    • Click “Add” to add another action
    • Select “Delete the message”
    Rule entry dialog
  • Click Ok to save the rule

It should be noted that this only solves the issue of new mail being routed to your destination email service. Anything that is currently in your inbox will remain unless you manually migrate those messages.

Quick and Dirty Authentication for AWS AppStream 2.0

I recently ran into a situation where AWS AppStream 2.0 might be a viable choice for securely delivering a desktop application required for an important pilot project. I won’t go into details, but the server-side of the pilot is already being hosted in AWS, so it only made sense to attempt to find a solution within that platform.

With that said, the first sticky wicket became authentication. AppStream 2.0 supports two kinds of authentication:

  • Federated login using SAML
  • Short Duration URLs

It so happens that we do have full support for SAML via Shibboleth. However, the process to provsion and configure it may be overkill for a short term pilot with a limited number of users. That immediately means considering short duration URLs.

Short duration URLs (or temporary URLs) are just that. They are a pre-authenticated URL generated by a trusted source and expire after a certain amount of time. AppStream 2.0 provides an API that generates these URLs. They can have a lifetime of one minute all the way through one day. Given the secure nature of this app, it is prudent to use pre-authenticated URLs for the shortest duration possible, and attempt to reduce the visibility of that URL as well.

In this scenario, imagine the process looking like this:

  1. A web application or a web server directory protected by basic auth (or some other method) is invoked.
  2. The user provides normal credentials to the web application or to the browser authentication prompt.
  3. Because we have successfully authenticated a trusted user, the web app or custom crafted CGI script calls the CreateStreamingURL API. It passes the user’s login name to the API so that AppStream 2.0 can keep track of who is whom.
  4. The API returns the pre-authenticated URL to the web application or CGI.
  5. The web application or CGI immediately redirects the user to the AppStream URL.
  6. The user is presented with the AppStream interface, ready to be used.

The rest of this post will detail a methdology for implementing such an interface. This will be as vanilla as possible, using only basic technologies to achive the desired outcome. You can take from this example and build a more robust solution in your own environments.

Key Assumptions

  • Overall solution being implemented on a UNIX/Linux variant
  • Using Apache httpd
  • Using basic authentication using an .htaccess file, and an htpasswd file to control access to the protected resource
  • The code in charge of generating the short duration URL and redirecting the user will be written in PHP
  • Composer will be used to install the AWS SDK for PHP

This assumes that all of the aforementioned items are installed and that you have them configured in a suitable way. It is outside the scope of this post to detail web server and PHP configuration. Furthermore, if you are building this into your solution, take the appropriate liberties of inferencing what I am doing and make it fit properly.

Last, but certainly not least, this assumes that you already have an AppStream stack configured, its subsequent fleet is running, and that the API will properly generate streaming URLs. You can validate this by selecting your stack and selecting “Create streaming URL” from the Actions menu inside the AWS console.

Phase 1: Configuring the Secure Site

  • Within your web server tree, create a new folder:

    1
    mkdir appstream-auth
  • Create a new .htpasswd file and add accounts:

    1
    htpasswd -c .htpasswd <username>

    (Drop the “-c” if you intend on appending additional users)

  • Create an .htaccess file to protect the site. Below is a sample that uses the aforementioned .htpasswd file.

    1
    2
    3
    4
    5
    6
    7
    8
    9
    AuthType Basic
    AuthName "Password Required"
    AuthUserFile "/full/path/to/.htpasswd"
    Require valid-user
    <Files .ht*>
    order allow,deny
    deny from all
    </Files>

Phase 2: Create a Restricted User within AWS

You will need to create a restricted user that has the capability of invoking the CreateStreamingURL API. You will do this on the Identity and Access Management (IAM) tool within the AWS Console.

  • Use the “Create Polcy” button to create a new policy

    • Assign it a name (e.g. appstream_createStreamURL)

    • Use the following policy:

      1
      2
      3
      4
      5
      6
      7
      8
      9
      10
      11
      12
      {
      "Version": "2012-10-17",
      "Statement": [
      {
      "Effect": "Allow",
      "Action": [
      "appstream:createStreamingURL"
      ],
      "Resource": "*"
      }
      ]
      }

      Note: I use Resource: “*“ purely for convenience. Feel free to restrict this down to the stacks you intend to expose via this account.

  • Use the “Add User” button to create the new user

    • For Access Type, ensure to only check Programmatic Access and do not generate a password that can be used to login to the web console
    • Associate the policy you created in the previous step. (Either do this via a group, or by direct policy association.)

Phase 3: Configure the AWS Credential File

You will need to configure a credentials file on your system using the previously created credentials so that the AWS SDK for PHP will know how to properly connect to the AWS API endpoint.

  • Create the directory for the credentials file

    1
    mkdir ~/.aws
  • In the ~/.aws directory, create a file called credentials and place entries similar to below:

    1
    2
    3
    4
    [default]
    region=us-east-1
    aws_access_key_id=<access key id>
    aws_secret_access_key=<secret access key>

Phase 4: Develop the Redirector

  • Inside the web app directory, run Composer to initialize PHP dependency management

    1
    composer init

    (Enter in reasonable defaults for the prompts.)

  • Install the AWS SDK for PHP

    1
    composer require aws/aws-sdk-php
  • Create the index.php file. An example is below:

    1
    2
    3
    4
    5
    6
    7
    8
    9
    10
    11
    12
    13
    14
    15
    16
    17
    18
    19
    20
    21
    22
    23
    24
    25
    26
    27
    28
    29
    30
    <?php
    # Load dependencies managed by Composer
    require 'vendor/autoload.php';
    # Instantiate an AWS SDK
    $sdk = new Aws\Sdk([
    'region' => 'us-east-1',
    'version' => 'latest',
    'profile' => 'appstream'
    ]);
    # Instantiate an AppStream client
    # *** NOTE: The following line is invoking a workaround. See explanation
    # below the snippet.
    $appstream = $sdk->createAppstream([
    'endpoint' => 'https://appstream2.us-east-1.amazonaws.com/'
    ]);
    # Generate the short duration URL
    $url = $appstream->createStreamingURL([
    'StackName' => 'sublime_text',
    'FleetName' => 'sublime_text-fleet',
    'UserId' => $_SERVER['PHP_AUTH_USER']
    ]);
    # Trigger the redirect to the short duration URL.
    header('Location: '.$url['StreamingURL'])
    ?>

NOTE: While assembling this overview, I apparently stumbled upon a bug in the AWS PHP SDK. The createStreamingURL() funciton is a part of AppStream 2.0, but the PHP SDK attempts to use the legacy API endpoint, causing issues. To work around this issue, I have forced the API to use the correct endpoint. I have no idea if this breaks the rest of the API calls related to AppStream. I do know it works for this example, therefore it will stand. You can follow the issue here on GitHub.

Summary

Obviously this is overly simplified. However, it shows how easy it could be to integrate AWS Appstream 2.0 into your applications. Not sure if we will use this for our pilot project, but I feel better knowing that we have an option available to us if it is necessary.

Re-inventing WeatherPhone

A friend and colleague of mine and I were talking late last year about some of the new features Amazon Web Services debuted during the 2016 AWS re:Invent conference. Two specific items that piqued our curiosity were Amazon Polly and Amazon Lex.

Quickly, Amazon Polly is a text-to-speech engine. Give it a string of words, an optional lexicon, and it will return a stream of audio in one of several formats. Amazon Lex, on the other hand, is an engine that not only translates speech to text, but will also attempt to understand the intent of the utterance given by the user.

Given these two breakthrough technologies, there are opportunities abound. This got us thinking: what could we do with these technologies that have not been done before?

We won’t get into those specific ideas, but what I will get into is a proof of concept of what this technology can do.

The Premise

Before leaving for break, I said that I would figure out a way to demonstrate the technology. One day, sitting in front of my computer, I was looking at the weather report (I use the Currently extension in Chrome), and it dawned on me: What about those old “dial a weather report systems from yester-year?”

As Walt Disney would say, “the way to get started is to quit talking and begin doing.” And so I began…

The Pieces and Parts

To relate back to the original discussion, I knew this had to have a telephony interface. Here are the pieces and parts that make this possible:

  • Asterisk - Open source PBX platform. I happen to have one in my basement to run my phone system. While not necessary, it was good to have it connected to the PTSN so that others on the outside could test. I use Flowroute as my ITSP.
  • Node.js - Server-side Javascript Engine
  • Weather Underground API - I needed a backend to get weather forecast information. WU provides a developer limited developer account at no cost to me.

Overall Architecture

There are three major components that comprise the weatherphone application.

  1. On the far left side is Asterisk.
  2. In the middle, the weatherphone application.

    • The weatherphone application itself is a client to Asterisk. It uses a WebSocket connection to maintain an ongoing session with Asterisk
    • When weatherphone starts and opens the WebSocket, it registers itself as an application within Asterisk
    • The weatherphone app registers with a specific name (aws-polly-weatherphone)
    • Dialplans in Asterisk can reference the registered name. For example, you might see in a dialplan the following:

      1
      exten => 8000,n,Stasis(aws-polly-weatherphone)
    • The Asterisk application Stasis transfers control of the call to an ARI application (here, weatherphone).

    • Weatherphone handles incoming events from the REST API. Depending on the type of event (inbound call, DTMF tone, voice recording, etc.), weatherphone can react in numerous ways.
      • Currently weatherphone will listen for DTMF signals from the caller. Once it has 5 digits recorded for a given caller, it will send that zip code to WU for weather data.
  3. On the far right side are both AWS and Weather Underground

    • Weatherphone calls Polly on demand to translate text strings to audio output.
    • Weatherphone also calls WU in order to get current conditions and forecast data.

Current Status

The code base, which can be found on GitHub, is functional. It’s not perfect, but it does prove that an Asterisk to Polly interface works.

What’s missing is Lex. Why? Amazon Web Services hasn’t given me access to the limited preview. Until then, you have to enter in your zip code via DTMF.

Issues and Limitations

If you want to use Asterisk as your telephony interface, it has no concept of streaming audio. Everything has to be a file. This means you must run weatherphone directly on the Asterisk server, or some sort of shared storage needs to be implemented between the two services. I’ve looked around the Asterisk Wiki and forum, and the developers do not seem to think this is a priority. At best, in Asterisk 14, it is possible to playback a URI. In fact, they are still working on their own text-to-speech engine. Personally, I would rather them focus on being an excellent telephony solution, and not a text-to-speech engine.

Nitpicking a little bit, I did not give a lexicon to Polly to help it render the weather forecast. So if the wind is west-southwest, all you here is “WSW” from Polly. Or that it is “23F” (literally pronouncing the “F”). That should be fairly straightforward to fix.

Obviously the code I wrote isn’t production ready whatsoever. It does what it needs to do to prove a point, but it is buggy and not optimal by any stretch. Proceed at your own peril!

Wrap-up

Overall, this proves that is possible to integrate a cloud-based text-to-speech engine with a popular telephony solution. As soon as I can get access to Lex, I will continue improving this code base so that you can ask weatherphone specific questions and it attempt to give you a relevant answer.

With those pieces together, imagine the possibilities!

Get the code here: https://github.com/seliger/weatherphone

Google Home -- Seems Underwhelming at the Moment

Since my brother-in-law and his wife are living with us for a few weeks while “the woods” is being finished, they have let me play around with their Google Home. It was a struggle from the get-go.

Off to a Poor Start

First and foremost, if you’ve set your Google Home up elsewhere and expect to plug it in at someone else’s house and run their gear, you’re looking at the wrong device. Once we finally got it connected to my WiFi, it wouldn’t talk to any of my devices.

Of course, we did things the hard way and did a factory reset by holding down the mute button for 10 seconds. Once it reset, I reconnected to the WiFi and MY Google account. Suddenly it was able to see my devices. I found this a bit strange as anyone who can access my network can see my other Chromecast devices without any sort of additional authentication. Why the Google Home can’t, I haven’t a clue.

Can You Hear Me Now?

I have a VIZIO Crave 360 speaker that I received for Christmas. It sounds great. It’s even cute because I can put the Google Home and the Crave 360 into an audio group and cast to them simultaneously. Unfortunately, the Crave 360 shows how (relatively speaking) the Home’s speaker is inferior. Don’t get me wrong, for it’s size, it does an acceptable job. However, compared to the Crave 360, the sound is muddy and muffled.

Also, even with music playing, it is hard to hear Google at times. It will lower the music on itself, but not on any other output devices. Furthermore, if you already had the Home turned down low, it doesn’t speak up so you can hear it. I guess that’s great if you don’t want to wake up the baby in the next room over, but for me, I just want to hear what she’s trying to tell me. (More on that in a moment.)

Still a Toddler in Understanding Commands

This was the most gut wrenching part… One would assume that the smart folks at Google would want to cram pack as much functionality as possible. However, I find myself woefully disappointed in what I cannot do with the device. In the couple of hours of messing around with it, I quickly found these several things horribly broken:

  • In Google Play Music, it has no idea how to play auto-playlists. For example, I really like to listen to the variety in my “Thumbs Up” list. No such luck. It has no idea about this supposed playlist.
  • I cannot tell Google Home that I like a song. I would tell Google, “I like this song,” with the expectation that it would automatically add it to my Thumbs Up list (I suppose I shouldn’t be surprised given the bullet above…). How did I work around this? I told my phone to listen to the current track, tell me what it was, and go to it in the Google Play Music app. How backwards is that?
  • As a joke, I wanted to text my wife who was off in another room. Google quickly responded, “I don’t know how to do that yet.” Seriously? My phone has done that for years…
  • We were running the fireplace last night. I like to run the furnace fan to circulate the air throughout. While Google Home can control my Nest, it had no idea what it meant when I told it, “run the fan for an hour.” There’s certainly an option to do that in the Nest App…
  • Offhandedly, I told it simply to cast Youtube to the livingroom TV. It found some random TED talk about homosexuality and started casting it. This was only slightly awkward with my 4 and 7 year olds in the room who don’t quite yet understand those aspects of life yet.
  • If you are not using the Gmail app, it does not sync your calendar. For example, I have been a long-time (well before Gmail supported Exchange Active-Sync) user of Nine, and while it integrates with the Google calendar on my phone, Google Home has no idea of anything on my agenda. Pity.

I’m not alone. Corbin Davenport over at Android Police reported similar disappointments just yesterday. He made the comparisons between the Pixel, Google Now, and the lacking Google Home. In the comments people also put together the fact that Google rather keep halfway re-inventing the wheel, rather than just presenting one strong platform. Interesting theory.

Novel, but Not Necessary…

Don’t get me wrong. The Google Home is certainly cute, but for me it is a novelty. It needs to know more about the world it came from (e.g. Google an it’s plethora of platforms…). I feel like they spent more time teaching Google Home how to tell terrible jokes, rather than how to use the network of platforms it has connected to it, that we as humans are used to using.

I really want to like it, because I tend to be a gadget guy. However, this one is not sitting well with me. I’d rather go buy another Crave 360 and have tunes simulcast throughout my house.

© 2017 Corey Seliger All Rights Reserved.
Theme by hiero